Blog home / Photography Tips for Mountain Hiking from Sherry Ott
Hiking among majestic peaks, scrambling up mountainsides, ‘sliding’ down a scree slope, AND capturing the moment. How do you balance mountain hiking and do great photography?
One of the hardest types of photography is trying to get great shots as you are on the trail. After all, your first priority when you’re hiking should always be safety, and when you are trying to also photograph the mountains and landscapes, it can become a lot to juggle, not to mention that it’s a lot of extra weight to carry in an already heavy pack. Plus, when you’re hiking (especially with a group) you don’t have the luxury of hanging out until the light or scene is ‘just right’ for the photograph, you have to keep going along the trail to reach your destination.
These mountain hiking photography tips are mainly for people who want to go beyond a snapshot and actually tell a story or evoke a feeling of place with photography in the mountains. The tips shared are primarily for photo enthusiasts and amateurs carrying a DSLR or mirrorless camera; one that has interchangeable lenses. However, these tips and techniques can apply to smart phones and compact cameras.
On the trail
Time of day
Photographers always talk about how important time of day is when it comes to shooting. They tell you to go out at dusk and dawn and shoot with the favorable light. Or they will recommend to go out and scout a location for the best light and shadows and then come back and shoot at the most optimal time. However, one of the hardest things about shooting while hiking for multiple days is that first and foremost you are there to hike and get from point A to point B. That means that you have a schedule to keep and typically a group to follow. The idea of putting yourself in the right place at the exact right time for photography isn’t really possible; so you have to take what Mother Nature gives to you and work with it the best you can.
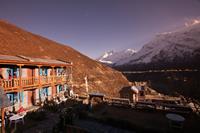 There was no time to stick around to capture this mountain hut without shadows as we had to get on the trail that morning and start hiking. So you work with what you can and keep moving.
Of course try to get an early start hiking to take advantage of the good light, and shoot more towards the beginning and end of the day. However if you come across a great scene in the mid day harsh light, don’t skip the photo, take it and consider these tips:
- Underexpose the image a bit as you may be able to edit those dark areas in post processing.
- Use a polarizing filter to help filter the light and reduce lens flare.
- Compose the shot so there is not as much sky in the photo, cropping in and filing the frame with more mountain or tree details instead of the bright contrasting sky.
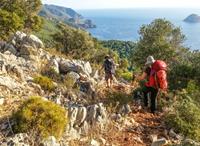 If you shoot in the midday sun, consider only showing a sliver of sky as it will be too bright for the rest of the picture.
- If you are photographing a person, see if you can move them into the shadows or under a tree to diffuse the harsh midday light.
Be Ready
When hiking you have to be ready for the scene and be able to pick up your camera and shoot quick before the object or opportunity passes. This normally means that you don’t want to be fumbling around trying to get your camera out of your pack as the wildlife wanders off or the interesting person hikes past you. When possible on the trail, have your camera out and ready, with the appropriate settings (ISO, aperture, and shutter) for the mountain scene.
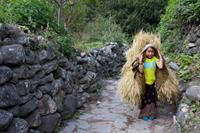 A little girl passes me on the trail to Nepal, I had to be quick with my camera to get this picture!
Hiking with a camera around your neck though all day can be a pain, literally. You want to take advantage of your backpack design and try to disperse the weight of the camera on your hips instead of your neck or shoulders, which will likely become sore after a while on the trail. Consider taking your camera and putting the strap around your neck, then take both of your arms and put them through the straps too. Since you have a backpack on, this means the camera strap will now be resting on your backpack putting the weight all onto your shoulders and hips like the backpack already is designed to do. The camera will rest on your torso nicely. Plus, it will be easily available to pick up quickly and get the shot of the wolf crossing the trail!
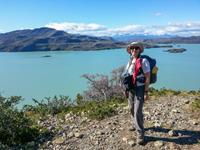 How you can carry your camera on your front, draped over your backpack straps, and have easy access to your equipment.
Brace Yourself
As you hike, you’ll likely be breathing hard from the effort of hiking, this means you have the potential of adding in camera shake and ultimately blurriness to your photos. To combat camera shake and blurriness, be sure to brace yourself when you take the photo. Lean on a tree, a rock wall, or anything that can steady you.
Composition
Rule of Thirds
Don’t put your subject (mountain peak, tree, trail) in the center of the picture. It is the simplest thing you can do to change a picture from ok to great. The concept is called Rule of Thirds:
“An image should be imagined as divided into nine equal parts by two equally-spaced horizontal lines and two equally-spaced vertical lines, and that important composition elements should be placed along these lines or their intersections. It is believed that by aligning a subject with these points creates more tension, energy and interest in the composition than simply centering the subject would.”
This rule applies to your horizon line too! Avoid putting your horizon in the middle of the photo and follow the rule of thirds instead.
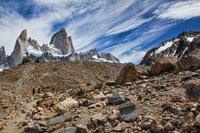 The mountain peaks in the rule of thirds.
People Perspective
Mountains are often huge, steep, and daunting; however, if you just take a typical landscape only photo you may look at it and think, “It felt bigger and steeper in person”. Often what we see is different than what the camera sees. One thing that really provides a perspective of size or inclines is to take a photograph with a person in the scene so that you can get a better perspective of the size of the landscape. In addition, adding people to your pictures (maybe of them hiking on the trail) gives the trail more life and transports the viewer to the scene. And finally, try to find people who are wearing colors who will show up in the scene; people wearing brightly colored gear is best.
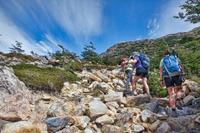 People can help you show how steep a trail is.
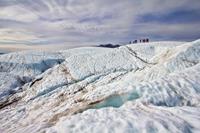 People used to show how big a glacier is.
The Perfect Landscape
Landscape isn’t just about a big, wide shot of land and sky, the best landscape shots normally have an object or something in the foreground that it interesting too. Choosing a foreground object is maybe the most creatively important part of taking a great landscape shot.
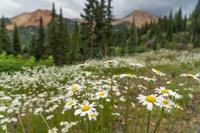 Flowers in the foreground create a better landscape photo.
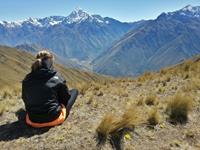 Put a person in the foreground to create a more dynamic and personal look at the mountains.
Get Low
When you put the camera close to the ground you create interesting perspectives. You’ll definitely get much bolder lines and compositions which objects in the foreground appearing bigger and more dynamic. Most of us see something we want to photograph, put the camera up to our eye level and click. However photography is about moving; crouching, standing on things, putting your camera on the ground and changing perspectives.
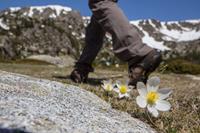 Get low and capture hiking boots on the trail.
Use these photography tips on your next mountain hiking adventure and you’ll come home with an oooohhh and ahhhhh worthy portfolio you’ll be proud of!
About the author: Sherry Ott is a long term traveler, blogger, and photographer with one goal in mind - to make you wish you were somewhere else. She writes about her nomadic lifestyle and around the world adventures on Ottsworld.com. She has hiked the Annapurna Circuit, walked the across Spain on the Camino de Santiago, kayaked in Antarctica, and drove a auto rickshaw across India for charity. She continues to seek out adventurous unique opportunities to challenge herself and inspire people to overcome their fears and reap the benefits of travel.